How I upgraded my Turris Omnia OS version from 3.x to 4.x
I have been sold on the promise of a high-performance extensible home router running open-source firmware and OS all the way back in 2015/2016, when the team behind the Czech national domain registrar (CZ.NIC) announced their Indiegogo campaign for Turris Omnia. The campaign was a big success, it has raised over $1.2M USD. Since then, the team kept working on further improvements of the operating system and in October 2019, they released a new major version Turris OS 4.0. Unfortunately, the migration from 3.x is not automated, which I found a bit disappointing. An important reason for choosing somewhat-expensive Omnia was the promise of frequent and fully-automated updates 🤷♂️
One of my biggest pain points with Omnia have been unreliable wifi. While Android and Windows PC devices work fine, my Apple devices (iPhone and MacBook Pro) often end up in a weird state when the device shows wifi connection but HTTP requests never get back. Recently, another Omnia user posted a nice summary of the problem and possible solution in the forum, so I decided to invest some time into tinkering with the router with the hope of getting a reliable wifi again. (Troy Hunt’s recent blog post Friends Don’t Let Friends Use Dodgy WiFi was another nudge.)
I decided to bite the bullet and start with upgrading Turris OS to the latest and greatest (?) version 4.x. It turns out the upgrade is super easy, as long as you don’t mind loosing your existing configuration. 🙈 While it’s possible to save the 3.x config and then restore it in 4.x version, such operation breaks the router in subtle but important ways (automatic update no longer works, OpenWRT thinks there is a misconfigured virtual LAN switch, etc.).
Fortunately, my config is very simple. Besides the usual WLAN, LAN and wifi
setup, I used OpenWRT’s LuCI web interface to tweak txpower setting of both
wifi adapters to lower values — I don’t want to be “grilled” by microwaves more
than necessary.
Here is a step-by-step guide, I hope you will find it helpful. I could not find anything similar in Turris Omnia documentation or the forum, which speaks for itself. 🤨
- Review your current configuration, both in Foris and LuCI interfaces. Write down important settings like wifi channels and any other settings you will want to restore after upgrade.
- Find a USB drive, prepare a LAN (Ethernet) cable and a USB-LAN dongle for your computer if needed.
- Follow the instructions for re-flashing the router from USB:
Download the latest version of Turris Omnia’s system image from https://repo.turris.cz/hbs/medkit/omnia-medkit-latest.tar.gz. Save the file
omnia-medkit-latest.tar.gzto USB flash drive to the root directory. (…) Connect the USB flash to the Turris Omnia router and use reset button to select mode 4 (4 LEDs).
-
Wait until the operation completes and the router starts.
-
Connect to your router via LAN cable, open the administrative interface at http://192.168.1.1/ and follow the Guided Mode to manually restore your router config.
-
If you are tweaking advanced settings, open also LuCI to make the necessary changes there.
As far as I can tell so far, the 4.x configuration UI looks pretty much the same as in 3.x and the Guided Mode makes the manual restore process very quick. The most notable difference is the introduction of “Network Interfaces” section, where you can assign different network devices (WAN, LAN, WLAN) to different zones: WAN, LAN, Guest Network. Here is how the default setup looks like:
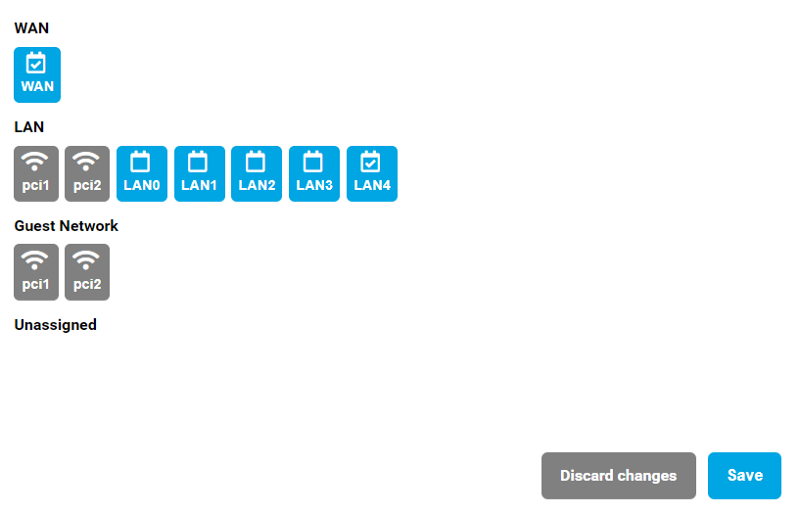 Network interfaces in Foris UI
My next step is to tweak 2.4 GHz wifi to see if I can get a stable connection, but that’s a story for another day…
Originally published at https://medium.com/@bajtos/how-i-upgraded-my-turris-omnia-os-version-from-3-x-to-4-x-d0c5e96f48a3